11 What was the original purpose of the bunker?
A. a government shelter
B. a military command center
C. a civilian storage facility
12 What rule must visitors follow during the tour?
A. keep their voices down
B. stay with the group
C. wear hard hats
13 What is the temperature like inside the bunker?
A. freezing cold
B. uncomfortably warm
C. consistently cool
14 The guide mentions that the emergency rations
A. are still edible.
B. were mostly stolen.
C. taste very bland.
Questions 15-20
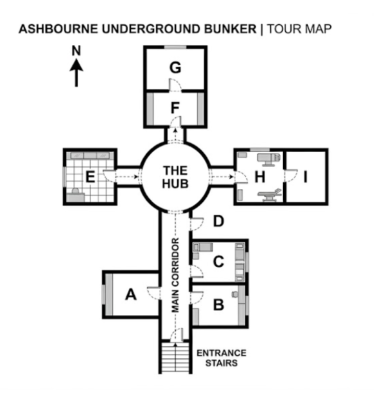
Label the map below.
Write the correct letter, A-I, next to Questions 15-20.
15 Security Checkpoint
16 Decontamination Area
17 Medical Bay
18 Communications Room
19 Sleeping Quarters
20 Generator Plant
Keys
11 B
12 B
13 C
14 C
15 A
16 C
17 E
18 F
19 G
20 H
Transcript
Part 2: You will hear a tour guide giving a talk to a group of visitors at a historical underground bunker.
GUIDE: Welcome everyone to the Ashbourne Underground Bunker. I’m your guide for today. Before we head down the steps, I’ll share a bit of background and go over some basic safety guidelines.
You might wonder why this complex was built. Initial blueprints proposed using this space as a secure government shelter for politicians, but escalating tensions meant those plans were scrapped. Instead, it was constructed to serve as a military command center, coordinating regional defenses. It was never intended for civilian storage.
During our tour, there are a few rules. The acoustic dampening is excellent, so you don’t need to keep your voices down – ask questions normally. We removed the low cables, meaning hard hats are no longer required. However, the complex is a maze, so it’s absolutely vital that you stay with the group. Please don’t wander down any unmarked tunnels.
Regarding the environment, you might expect it to be freezing cold given our depth. Surprisingly, the earth acts as an insulator, maintaining a consistently cool climate year-round. It never gets uncomfortably warm, except in the restricted engine block. A light jacket is perfect.
In the mess hall, you’ll see displays of emergency rations. They look edible, but don’t touch them, as they’re preserved with chemicals. None were ever stolen by scavengers, as the bunker remained sealed. Veterans who ate them back then frequently complained that they taste very bland, resembling cardboard!
Right, let’s look at the map on the board here so you can get oriented before we descend. We are currently standing at the top of the Entrance Stairs.
As we reach the bottom of the stairs, you’ll see a long main corridor ahead. The very first room on your left is the Security Checkpoint. All personnel had to sign in there before proceeding any further.
Opposite that, on the right-hand side of the corridor, there are two rooms. The one closest to the stairs was a supply closet, but the second one, just past it, is the Decontamination Area. It is fitted with heavy shower units for biological emergencies.
Moving further down the main corridor, you’ll enter a large circular room right in the middle, known as the Hub. If you take the path branching off to the left from the Hub, it leads directly into the Medical Bay, which still has some of the original surgical beds.
Back in the central Hub, if you look straight ahead, or North, you’ll see a doorway leading into a rectangular room. That’s the Communications Room, where operators would sit monitoring radio frequencies day and night. It is quite a fascinating setup, complete with old switchboards and telegraph machines that look like they belong in a museum. Directly behind that room, right at the very top of your map, are the Sleeping Quarters. They deliberately put the bunks as far from the entrance as possible to give the staff some peace and quiet.
Finally, from the central Hub, if you take the path branching out to the right, you’ll find the Generator Plant. It’s a massive space that housed the diesel motors needed to keep the lights on during a crisis.